Create a Table Using Thymeleaf Reading Data From a Db
1. Overview
In this quick tutorial, we're going to bear witness how to bind a List object in Thymeleaf.
To learn how to integrate Thymeleaf with Jump, you tin check out our main Bound article here – where you can also learn how to brandish fields, accept input, brandish validation errors, or convert data for display.
2. Lists in Thymeleaf Example
We'll start past showinghow to display elements of a List in a Thymeleaf page and how to bind a listing of objects every bit user's inputs in a Thymeleaf class.
For this purpose, we'll utilise a simple model shown in the following code:
public class Volume { private long id; individual Cord title; private String author; // getters and setters } Beside displaying existing books in our example, we're going to make it possible for the user to add together multiple books to the drove and besides to edit all existing books at in one case.
3. Displaying Listing Elements
Let'southward have a await at the following Controller method that returns the allBooks folio:
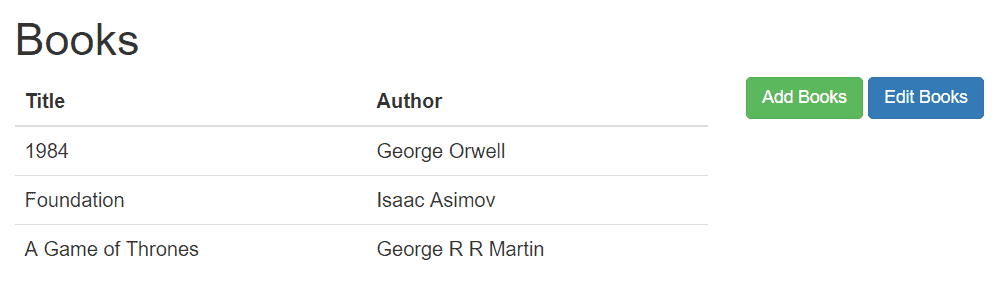
@GetMapping("/all") public String showAll(Model model) { model.addAttribute("books", bookService.findAll()); return "books/allBooks"; } Here, we've added Listing of Volume objects as a model attribute sent to the view, where we'll brandish it using an HTML tabular array:
<table> <thead> <tr> <th> Title </th> <thursday> Writer </th> </tr> </thead> <tbody> <tr th:if="${books.empty}"> <td colspan="2"> No Books Available </td> </tr> <tr th:each="book : ${books}"> <td><span thursday:text="${book.title}"> Title </span></td> <td><span thursday:text="${book.author}"> Author </span></td> </tr> </tbody> </table> Here, we're using theth:each property to iterate through the list and display properties of each object in information technology.
4. Binding a List Using Pick Expression
To send the listing of objects from the view to the controller via form submit, nosotros cannot use List object itself.
Instead, nosotros have to add together a wrapper object that volition hold the submitted listing:
public class BooksCreationDto { private List<Book> books; // default and parameterized constructor public void addBook(Book book) { this.books.add(book); } // getter and setter } Let'south at present enable the user to add 3 books in 1 form submission.
Showtime, we'll prepare the form page, passing our command object as aModel attribute:
@GetMapping("/create") public Cord showCreateForm(Model model) { BooksCreationDto booksForm = new BooksCreationDto(); for (int i = 1; i <= three; i++) { booksForm.addBook(new Book()); } model.addAttribute("form", booksForm); return "books/createBooksForm"; } As we tin see, we passed a list of three empty Volume objects to the view via the wrapper grade.
Side by side, nosotros need to add the form to a Thymeleaf page:
<course action="#" th:action="@{/books/relieve}" th:object="${form}" method="post"> <fieldset> <input blazon="submit" id="submitButton" th:value="Save"> <input type="reset" id="resetButton" name="reset" th:value="Reset"/> <tabular array> <thead> <tr> <th> Championship</thursday> <th> Author</th> </tr> </thead> <tbody> <tr th:each="book, itemStat : *{books}"> <td><input th:field="*{books[__${itemStat.alphabetize}__].title}" /></td> <td><input th:field="*{books[__${itemStat.index}__].writer}" /></td> </tr> </tbody> </tabular array> </fieldset> </form> And this is what the page above volition look like:
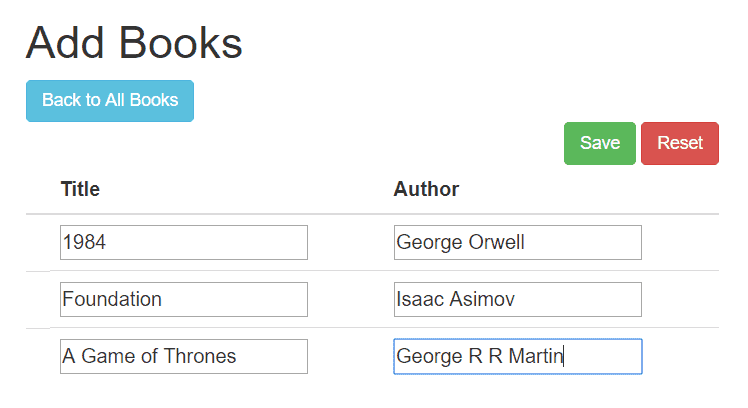
Let's accept a closer expect at what we did here. Starting time, nosotros used theth:object="${grade}" to specify the command object (the 1 nosotros passed every bit a Model attribute).
The side by side matter worth noting is that nosotros accessed the list with a option expression using:
<tr th:each="volume, itemStat : *{books}"> And finally, we're mapping our inputs equally properties of the list elements using th:field.
However, we also need to use theitemStat variable to define which list element we're referring to, every bit demonstrated in:
th:field="*{books[__${itemStat.alphabetize}__].title}" The last pace is really to manipulate the submitted data on the back-terminate. We'll use the command object as the @ModelAttribute in our @PostMapping method in the controller, save the retrieved list of books and return all existing books to the user:
@PostMapping("/salvage") public String saveBooks(@ModelAttribute BooksCreationDto form, Model model) { bookService.saveAll(form.getBooks()); model.addAttribute("books", bookService.findAll()); render "redirect:/books/all"; } Afterward submitting the course to the /save endpoint, we'll go the folio with all the newly added books:
5. Bounden a Listing Using Variable Expression
For this instance, we'll first load all existing books into the control object:
@GetMapping("/edit") public String showEditForm(Model model) { Listing<Volume> books = new ArrayList<>(); bookService.findAll().iterator().forEachRemaining(books::add together); model.addAttribute("grade", new BooksCreationDto(books)); return "books/editBooksForm"; } The HTML page is similar, with the almost noteworthy differences in thethursday:each block:
<tr th:each="book, itemStat : ${form.books}"> <td> <input hidden th:name="|books[${itemStat.alphabetize}].id|" th:value="${book.getId()}"/> </td> <td> <input th:proper noun="|books[${itemStat.index}].title|" th:value="${volume.getTitle()}"/> </td> <td> <input th:proper noun="|books[${itemStat.index}].writer|" th:value="${book.getAuthor()}"/> </td> </tr> As shown in <tr th:each="volume, itemStat : ${form.books}">, we accessed the list in a slightly unlike mode, using variable expression this time. Especially relevant is to notice that we providedname and value for input elements to properly submit information.
We also had to add hidden input which will bind the current book'southward id considering we don't want to create new books simply to edit existing ones.
half dozen. Conclusion
In this article, nosotros illustrated how to use List object in Thymeleaf and Leap MVC. We've shown how to display the listing of objects sent to the view, but we put the primary focus on two means of bounden user inputs as a list in Thymeleaf course.
All of the lawmaking snippets, mentioned in the article, can be institute in our GitHub repository.
Create a Table Using Thymeleaf Reading Data From a Db
Source: https://www.baeldung.com/thymeleaf-list
0 Response to "Create a Table Using Thymeleaf Reading Data From a Db"
Post a Comment